Fishbone is a great technique for teams exploring the cause(s) of a specific challenge facing the team.


Table of Contents
- Overview and video
- Define Phase
- Think Phase
- Group Phase
- Elaborate Phase
- Discuss Phase
- Wrap Up Phase
- Follow-up After the Fishbone
Overview and Video
💡Look for the special Need Help button in each phase of Fishbone for more details about the phase's purpose and best practices for facilitation.
The Fishbone technique isn’t new to the agile space, but what is new is the combination of Retrium’s guided facilitation with the fishbone diagram to help teams explore deeply what’s causing the challenges they’re facing. The Fishbone template can be accessed from the technique menu under Root Cause Analysis.
Define Phase
In the define phase, you will create a succinct problem statement that reflects the current challenge facing your team. A well-crafted and appropriate problem statement is the single most important foundation for a successful fishbone retrospective. In the fishbone diagram, the problem statement becomes the head of the fish. This statement should clearly define the problem you want to discuss.

- Both the facilitator and the participants can edit the problem statement.
- To help you validate that your problem statement is ready for discussion, the Define phase contains criteria statements that help the team qualify an appropriate problem statement.
- Ask your team to vote by clicking on the thumbs up or thumbs down or question mark icons on if they agree, disagree, or have questions about how the criteria fit with the statement.
- If there is enough agreement on the criteria statement, the facilitator will check it off.
- If anyone disagrees or has a question, discuss what needs to be done to address the concern and adjust the problem statement appropriately.
- Once there is agreement that the problem statement is clearly defined, it’s time to move on to the next phase.
💡 Your team may not have 100% agreement on each of the statements. That’s OK! As long as the statement is good enough to encourage discussion, you’ve completed this phase of the retrospective.
Think Phase
In the Think phase, the team will individually and anonymously contribute causes for discussion.
❗️Unlike in other Retrium techniques, the notes are visible to all participants by default to help prompt additional causes that relate to the ones your teammates have already shared. If you prefer to keep the notes blurred, the facilitator can change that in the settings.
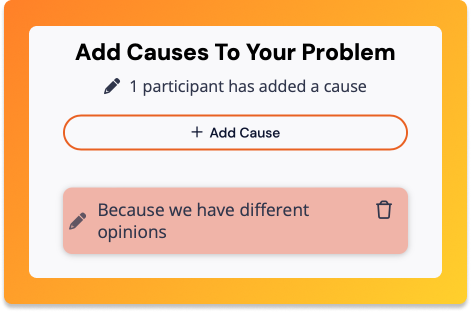
- Think of these causes as a continuation of your problem statement. For example, <PROBLEM STATEMENT> because <EXAMPLE>.
- The pencil icon displays the number of participants that have added at least one note. This will help you gauge how many voices are being heard in your retrospective and allow you to gently nudge the team toward participation.
- Like other Retrium techniques, you can add emojis and set a time box.
- Once contributions have slowed, it’s time to move on to the next phase where you’ll group common causes into categories.
Group Phase
Grouping the causes together help organize your team's thoughts into categories.

- As your team groups similar cause statements together, you’ll see the bones of the fish begin to form. These are called branches. Each branch requires a title.
- Any cards that are not grouped will be added to a branch with the name “Other” as the last branch of your fish in the next phase.
- You can choose to zoom out and in on the diagram by clicking on the magnifying glass in the upper right corner of the page. While you’re zoomed out, you won’t see the drag and drop activity but the fish will be updated as the team adds and edits. You must zoom in again to be able to add and edit the groups.
- Once the causes are grouped and the branches are titled, it’s time to move on to the next phase.
Elaborate Phase
During the Elaborate phase, your team will again be asked to contribute cause statements that dig deeper into what may be contributing to the problem statement being addressed.
💡 Each top card in a branch can go up to 10 levels deep in this exploration, but most causes will probably only need a few cause statements.

- Think of this phase as asking "Why?" in response to each of the original causes identified.
- You can choose to zoom out and in on the diagram by clicking on the magnifying glass in the upper right corner of the page. While in the zoomed out view, you will not be able to add notes. Zoom back in to continue adding ideas.
- If you decided to blur the cause text in the Think phase, new causes will be blurred in the Elaborate phase as well. You can change that setting in the bottom menu by clicking on the gear icon.

- Once the team is ready to move on, it’s time to discuss the causes you’ve identified.
Discuss Phase
In the Discuss phase, your team will unpack the network of causes that led to the problem statement.
💡 During this phase, you are not working to solve the problem statement. You are choosing the causes that you want to take address through additional reflection and discussion at another time.
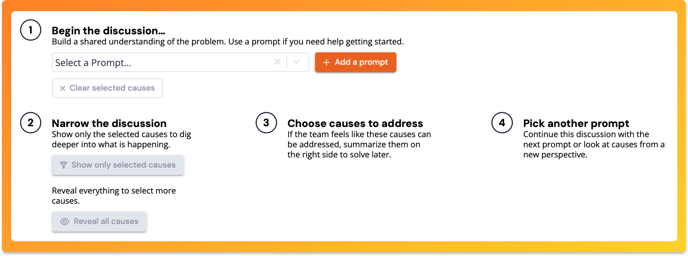
- Here you will use some new facilitator tools to help you identify root causes that your team will want to address later.
- In the dropdown menu you will see several prompts to choose from to guide this discussion. Additional prompts can be added by using the Add a prompt button.
- The facilitator will choose the prompt that best fits the problem statement then the team will select the causes that fulfill that prompt. Once activity slows, you can show only the selected causes to narrow the discussion by clicking Show only selected causes.
- At any point, the facilitator can click Reveal all notes and it will reset the discussion to the entire fish.
- If you feel that you could narrow the field of causes even further, the facilitator can select a new prompt, clear the selected causes, and instruct the team to repeat the selection process with a field narrowed to this new prompt.
- Your team can add a Next Step Action using the panel on the right-hand side of the page under the Causes We'll Address heading. To link the relevant causes, highlight them in the fishbone diagram (shown in yellow below) and click the attachment button.
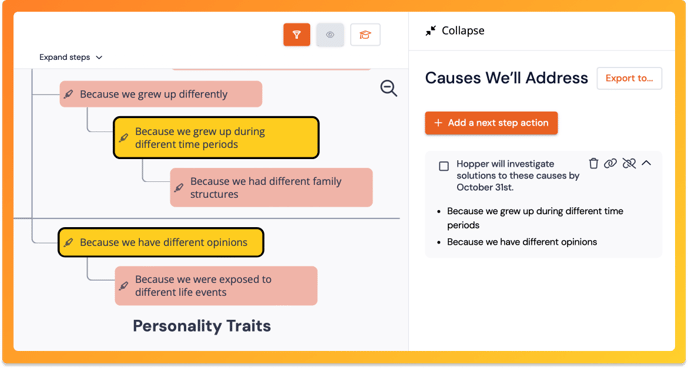
- Highlighted causes are associated with their prompt, so be sure to change prompts before clearing the selected causes to preserve that association. You’ll be able to see that association in History for a record of the discussion.
- Repeat this process, with a different prompt, until you feel that you’ve completed the discussion, and captured all relevant root causes that you want to address.
Wrap Up Phase
When it’s time to end your retro, wrap it up by asking your team for feedback on the value of the conversation that just took place. Once everyone has selected their response, you can reveal the results and discuss what could have made your retro more efficient, if necessary.
Follow-up After the Fishbone
Once you close your retrospective, the causes you’ve identified will be saved as causes to address (CTAs) in your Team Room Home tab as well as in your Team Room History tab. In a future meeting, you can use these causes and decide how you will improve or fix them.

Do you have any other questions we can assist with, or need further advice? We'd be happy to help—just reach out to us!